Have you heard about rigging?, probably yes since you’re looking at this tutorial.
I’m going to help you out learning how to quickly and effectively use Rigify, the automatic rigging tool that comes with blender and that you can probably use for most of your projects… I have used it several times for commercial projects and such.
It allows for easy and quickly rigging a biped character with no sweat, and with basically 0 rigging knowledge, although rigging knowledge is always needed if you want to customize it to add more legs, or arms, a tail, etc.
In this tutorial you’ll learn:
- How and were to activate the rigify add-on
- How to setup your rig with rigify.
- Connecting your character to your rig.
- A little bit about weight painting.
- Getting your rig ready to animate.
So we’re gonna rig this character designed by Claudio Saavedra, and modeled by Pamela Contreras
![2016-03-01 12_04_02-Blender [C__Users_Pintamonos 5_Downloads_personaje31.blend].png](https://lollypopmancom.files.wordpress.com/2016/03/2016-03-01-12_04_02-blender-c__users_pintamonos-5_downloads_personaje31-blend.png?w=673&h=767)
It’s not the ideal pose, T pose is very outdated what should be used is A pose, but in any case, since blender’s auto weighting system is so good, you’ll see that here we wont have a problem.
So activate the add-on, in File>User Preferences then go to the ADD-ONS tab, then in the search bar write: Rigify make sure that you check on the little checkbox next to it… If your check box is in the right side of the screen it’s because your version of blender is a bit older, but everything still works the same.![2016-03-01 12_10_59-Blender [C__Users_Pintamonos 5_Downloads_personaje31.blend]](https://lollypopmancom.files.wordpress.com/2016/03/2016-03-01-12_10_59-blender-c__users_pintamonos-5_downloads_personaje31-blend.png?w=1100)
Then go to the FILE tab, ![2016-03-01 12_11_39-Blender [C__Users_Pintamonos 5_Downloads_personaje31.blend]](https://lollypopmancom.files.wordpress.com/2016/03/2016-03-01-12_11_39-blender-c__users_pintamonos-5_downloads_personaje31-blend.png?w=1100)
And click on the “Auto Run Python Scripts” check box
Now you’re ready to start the rigging process.
Go to your 3D viewport, and hit Shift+A (or look in the add menu) and select “Human (Meta-Rig)”![2016-03-04 08_31_47-Blender [K__Dropbox_Proyecto_Wacom_personaje_modelo_personaje31.blend]](https://lollypopmancom.files.wordpress.com/2016/03/2016-03-04-08_31_47-blender-k__dropbox_proyecto_wacom_personaje_modelo_personaje31-blend.png?w=1100)
An armature with premade bones will appear, wherever your 3D cursor is in the scene,
![2016-03-04 08_33_02-Blender_ [K__Dropbox_Proyecto_Wacom_personaje_modelo_personaje31.blend]](https://lollypopmancom.files.wordpress.com/2016/03/2016-03-04-08_33_02-blender_-k__dropbox_proyecto_wacom_personaje_modelo_personaje31-blend.png?w=1100)
to bring it back to the 0,0,0 or center of the scene, hit: alt+g that will reset it’s position.
So with this armature, what we will do is adapt it to our character, in this case i’ll scale the armature first to match my character as much as possible, usually the best way is to bring the shoulders to your character’s shoulders height, and that gives you a good start to adjust the rest of the body
![2016-03-04 08_36_00-Blender_ [K__Dropbox_Proyecto_Wacom_personaje_modelo_personaje31.blend]](https://lollypopmancom.files.wordpress.com/2016/03/2016-03-04-08_36_00-blender_-k__dropbox_proyecto_wacom_personaje_modelo_personaje31-blend.png?w=1100)
So since I scaled the armature, not the bones, i have to apply the scale to it.
As you can see my scale is 3.823 in the x y and z axes,
![2016-03-04 08_39_43-Blender_ [K__Dropbox_Proyecto_Wacom_personaje_modelo_personaje31.blend]](https://lollypopmancom.files.wordpress.com/2016/03/2016-03-04-08_39_43-blender_-k__dropbox_proyecto_wacom_personaje_modelo_personaje31-blend.png?w=1100)
but when the rig gets built it will obey to the 1,1,1 scale, and so we need to turn this scale into that.
So hit Ctrl+A and select scale
![2016-03-04 08_41_42-Blender_ [K__Dropbox_Proyecto_Wacom_personaje_modelo_personaje31.blend]](https://lollypopmancom.files.wordpress.com/2016/03/2016-03-04-08_41_42-blender_-k__dropbox_proyecto_wacom_personaje_modelo_personaje31-blend.png?w=1100)
bam!, your scales are back to 1,1,1!
Now for better handling, we’ll set some options in the object data
![2016-03-04 08_43_53-Blender_ [K__Dropbox_Proyecto_Wacom_personaje_modelo_personaje31.blend]](https://lollypopmancom.files.wordpress.com/2016/03/2016-03-04-08_43_53-blender_-k__dropbox_proyecto_wacom_personaje_modelo_personaje31-blend.png?w=1100)
of our properties menu, go down to Display
![2016-03-04 08_44_32-Blender_ [K__Dropbox_Proyecto_Wacom_personaje_modelo_personaje31.blend]](https://lollypopmancom.files.wordpress.com/2016/03/2016-03-04-08_44_32-blender_-k__dropbox_proyecto_wacom_personaje_modelo_personaje31-blend.png?w=1100)
check the X-Ray check-box, and then change the Maximum Draw Type to “Wire”
![2016-03-04 08_45_38-Blender_ [K__Dropbox_Proyecto_Wacom_personaje_modelo_personaje31.blend]](https://lollypopmancom.files.wordpress.com/2016/03/2016-03-04-08_45_38-blender_-k__dropbox_proyecto_wacom_personaje_modelo_personaje31-blend.png?w=1100)
this way, you can see the armature through the character, and plis it’ll always be wire which will allow us to select it easily.
then go to edit mode
open the T panel, go to Options, and turn on “X-Axis Mirror”
![2016-03-04 08_48_51-Blender_ [K__Dropbox_Proyecto_Wacom_personaje_modelo_personaje31.blend]](https://lollypopmancom.files.wordpress.com/2016/03/2016-03-04-08_48_51-blender_-k__dropbox_proyecto_wacom_personaje_modelo_personaje31-blend.png?w=1100)
Now and because of this whatever you do in either side of the armature will get reflected to the other side automagically, so now, lets’ just adjust every bone to where it should be relative to our character, by selecting them with RMB, and then moving them around with G and rotating with R
![2016-03-04 08_55_24-Blender_ [K__Dropbox_Proyecto_Wacom_personaje_modelo_personaje31.blend]](https://lollypopmancom.files.wordpress.com/2016/03/2016-03-04-08_55_24-blender_-k__dropbox_proyecto_wacom_personaje_modelo_personaje31-blend.png?w=267&h=300)
![2016-03-04 08_55_48-Blender_ [K__Dropbox_Proyecto_Wacom_personaje_modelo_personaje31.blend]](https://lollypopmancom.files.wordpress.com/2016/03/2016-03-04-08_55_48-blender_-k__dropbox_proyecto_wacom_personaje_modelo_personaje31-blend.png?w=94&h=300)
Awesome, now your ready to create your rig!
go to the armature panel in the properties,
![2016-03-04 08_56_40-Blender_ [K__Dropbox_Proyecto_Wacom_personaje_modelo_personaje31.blend]](https://lollypopmancom.files.wordpress.com/2016/03/2016-03-04-08_56_40-blender_-k__dropbox_proyecto_wacom_personaje_modelo_personaje31-blend.png?w=1100)
now go down usually to the end of the menu, there you’ll find
![]()
Hit the button!, it’ll take 2 or 3 seconds and bam!
You’ll notice a few things now, first, you’re no longer in edit mode, and now you have two armatures, plus your outliner is filled with garbage, we’ll figure out what’s all of this.
Select the old armature (the one you modified just a few seconds ago)
![2016-03-04 08_59_26-Blender_ [K__Dropbox_Proyecto_Wacom_personaje_modelo_personaje31.blend]](https://lollypopmancom.files.wordpress.com/2016/03/2016-03-04-08_59_26-blender_-k__dropbox_proyecto_wacom_personaje_modelo_personaje31-blend.png?w=1100)
and move it to an other layer by hitting M and then clicking one of the squares.
![2016-03-04 09_00_08-Blender_ [K__Dropbox_Proyecto_Wacom_personaje_modelo_personaje31.blend]](https://lollypopmancom.files.wordpress.com/2016/03/2016-03-04-09_00_08-blender_-k__dropbox_proyecto_wacom_personaje_modelo_personaje31-blend.png?w=300&h=73)
We’ll keep that armature for a bit if we need to refine something.
then let’s go to the last layer
 ->
-> ![2016-03-04 09_02_41-Blender_ [K__Dropbox_Proyecto_Wacom_personaje_modelo_personaje31.blend]](https://lollypopmancom.files.wordpress.com/2016/03/2016-03-04-09_02_41-blender_-k__dropbox_proyecto_wacom_personaje_modelo_personaje31-blend.png?w=300&h=76)
And as you can see there are a bunch of objects that are the shapes that the armature has to be controlled, you can usually just delete them, but I like to keep them around until I call the rig finished, in the mean time to have them not mess up my outliner select them all, and then parent to the one called WGT-root by hitting Ctrl+P and selecting “Object”
![2016-03-04 09_07_47-Blender_ [K__Dropbox_Proyecto_Wacom_personaje_modelo_personaje31.blend]](https://lollypopmancom.files.wordpress.com/2016/03/2016-03-04-09_07_47-blender_-k__dropbox_proyecto_wacom_personaje_modelo_personaje31-blend.png?w=1100)
now in your outliner they’ll all be hidden under that one that we selected last.
![2016-03-04 09_09_45-Blender_ [K__Dropbox_Proyecto_Wacom_personaje_modelo_personaje31.blend]](https://lollypopmancom.files.wordpress.com/2016/03/2016-03-04-09_09_45-blender_-k__dropbox_proyecto_wacom_personaje_modelo_personaje31-blend.png?w=1100)
those lines that appeared are indicators that the objects are linked via parenting, if it bothers you too much, just make them dissapear by going to the Display panel on the N menu, and then unchecking “Relationship Lines”
![2016-03-04 09_13_46-Blender_ [K__Dropbox_Proyecto_Wacom_personaje_modelo_personaje31.blend]](https://lollypopmancom.files.wordpress.com/2016/03/2016-03-04-09_13_46-blender_-k__dropbox_proyecto_wacom_personaje_modelo_personaje31-blend.png?w=157&h=284)
![2016-03-04 09_14_22-Blender_ [K__Dropbox_Proyecto_Wacom_personaje_modelo_personaje31.blend]](https://lollypopmancom.files.wordpress.com/2016/03/2016-03-04-09_14_22-blender_-k__dropbox_proyecto_wacom_personaje_modelo_personaje31-blend.png?w=1100)
Go back to layer one
Now you’re ready to try to skin your character, and i don’t mean to play taxidermist, I mean link your character to the rig so it can get deformation.
to do this, select all the objects of your character, clothes, arms, legs, heads, because your character can often be several objects instead of one… and at the end select the armature called “rig” and since you already know how to parent, hit Ctrl+P and then select “With Automatic Weights”
![2016-03-04 09_18_54-Blender_ [K__Dropbox_Proyecto_Wacom_personaje_modelo_personaje31.blend]](https://lollypopmancom.files.wordpress.com/2016/03/2016-03-04-09_18_54-blender_-k__dropbox_proyecto_wacom_personaje_modelo_personaje31-blend.png?w=1100)
not much seems to happen afterwards, but If you select your geometry and go to the modifier panel you’ll see there is a modifier called armature, and in the object data panel you’ll see several vertex groups have been created
![2016-03-04 09_20_16-Blender_ [K__Dropbox_Proyecto_Wacom_personaje_modelo_personaje31.blend]](https://lollypopmancom.files.wordpress.com/2016/03/2016-03-04-09_20_16-blender_-k__dropbox_proyecto_wacom_personaje_modelo_personaje31-blend.png?w=265&h=300)
![2016-03-04 09_20_24-Blender_ [K__Dropbox_Proyecto_Wacom_personaje_modelo_personaje31.blend]](https://lollypopmancom.files.wordpress.com/2016/03/2016-03-04-09_20_24-blender_-k__dropbox_proyecto_wacom_personaje_modelo_personaje31-blend.png?w=300&h=220)
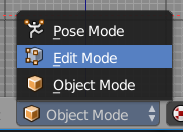
Go select your amature, get it to Pose Mode
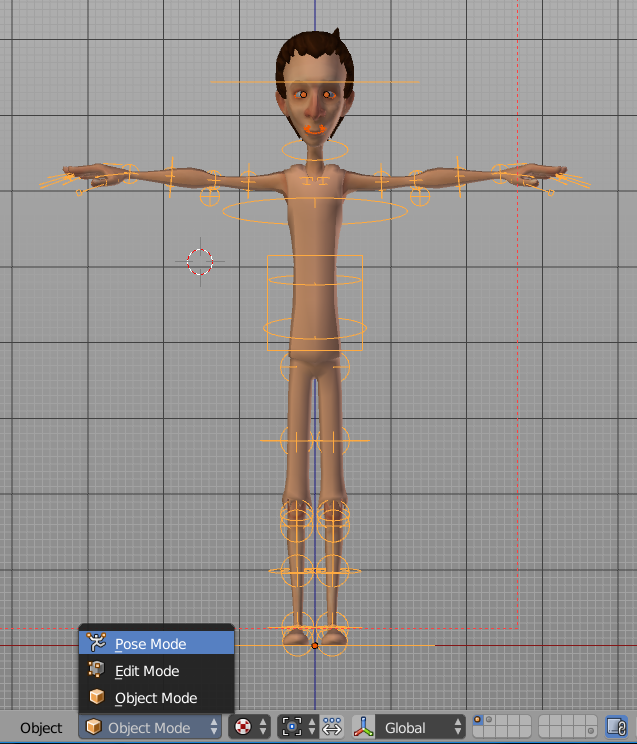
now select any controller to start deforming your character and pose away!
![2016-03-04 09_25_21-Blender_ [K__Dropbox_Proyecto_Wacom_personaje_modelo_personaje31.blend]](https://lollypopmancom.files.wordpress.com/2016/03/2016-03-04-09_25_21-blender_-k__dropbox_proyecto_wacom_personaje_modelo_personaje31-blend.png?w=1100)
Great, you’ll notice that usually the head isnt very well weighted, it ends up deformed by the neck and so in positions a bit more extreme you clearly see that is twisted or bent
![2016-03-04 09_27_55-Blender_ [K__Dropbox_Proyecto_Wacom_personaje_modelo_personaje31.blend]](https://lollypopmancom.files.wordpress.com/2016/03/2016-03-04-09_27_55-blender_-k__dropbox_proyecto_wacom_personaje_modelo_personaje31-blend.png?w=1100)
to fix this, we’ll go to the armature panel and select the layer where the DEF bones are, these are the only bones that are actually deforming your character, so we need to have that one selected to do some weight-painting
![2016-03-04 09_29_05-Blender_ [K__Dropbox_Proyecto_Wacom_personaje_modelo_personaje31.blend]](https://lollypopmancom.files.wordpress.com/2016/03/2016-03-04-09_29_05-blender_-k__dropbox_proyecto_wacom_personaje_modelo_personaje31-blend.png?w=300&h=158)
![2016-03-04 09_29_16-Blender_ [K__Dropbox_Proyecto_Wacom_personaje_modelo_personaje31.blend]](https://lollypopmancom.files.wordpress.com/2016/03/2016-03-04-09_29_16-blender_-k__dropbox_proyecto_wacom_personaje_modelo_personaje31-blend.png?w=300&h=158)
since we’re in that panel, let’s turn X-Ray again (you didnt go wrong here, it’s just that this is an other armature you need to turn X-Ray each time a new armature comes in) now select the head bone
![2016-03-04 09_32_21-Blender_ [K__Dropbox_Proyecto_Wacom_personaje_modelo_personaje31.blend]](https://lollypopmancom.files.wordpress.com/2016/03/2016-03-04-09_32_21-blender_-k__dropbox_proyecto_wacom_personaje_modelo_personaje31-blend.png?w=1100)
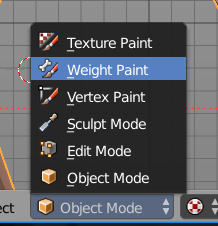
and then swich back to selecting the character, without changing modes, just select the character by RMB clicking it, and go to the modes and select Weight Paint
You’ll get this:
![2016-03-04 09_34_19-Blender_ [K__Dropbox_Proyecto_Wacom_personaje_modelo_personaje31.blend]](https://lollypopmancom.files.wordpress.com/2016/03/2016-03-04-09_34_19-blender_-k__dropbox_proyecto_wacom_personaje_modelo_personaje31-blend.png?w=1100)
So you get a gradient from red to blue, and in between there is orange, yellow, green, cyan. basically RED is a color closer to value 1 (1005 influence of that bone over the geometry), and BLUE is closer to 0 (no influence), you can check my tutorial in custom colors for weight painting to make this even more clear anyways, the idea here is that the head becomes red so now you have a brush in your hand, open the T panel and you can set the radius (size) that you can also change in the Viewport with F, and also check “AUTO NORMALIZE” ![2016-03-04 09_40_25-Blender_ [K__Dropbox_Proyecto_Wacom_personaje_modelo_personaje31.blend]](https://lollypopmancom.files.wordpress.com/2016/03/2016-03-04-09_40_25-blender_-k__dropbox_proyecto_wacom_personaje_modelo_personaje31-blend.png?w=212&h=300)
Now click and drag in your character’s face and you’ll see that the parts that arent red start turning red, and if your character is very deformed it’ll get back to normal quickly.
![2016-03-04 09_41_55-Blender_ [K__Dropbox_Proyecto_Wacom_personaje_modelo_personaje31.blend]](https://lollypopmancom.files.wordpress.com/2016/03/2016-03-04-09_41_55-blender_-k__dropbox_proyecto_wacom_personaje_modelo_personaje31-blend.png?w=1100)
Now you can go back to object mode, select your armature again, go to pose mode and turn the layers back to how they were by going to the armature panel or going to the rig layers created by the Rigify rig, that you can find in the N panel
![2016-03-04 09_43_56-Blender_ [K__Dropbox_Proyecto_Wacom_personaje_modelo_personaje31.blend]](https://lollypopmancom.files.wordpress.com/2016/03/2016-03-04-09_43_56-blender_-k__dropbox_proyecto_wacom_personaje_modelo_personaje31-blend.png?w=184&h=300)
and select the ones you need, to start animating I usually recommend to start simple so i go like this:
![2016-03-04 09_45_12-Blender_ [K__Dropbox_Proyecto_Wacom_personaje_modelo_personaje31.blend]](https://lollypopmancom.files.wordpress.com/2016/03/2016-03-04-09_45_12-blender_-k__dropbox_proyecto_wacom_personaje_modelo_personaje31-blend.png?w=1100)
and make sure you turn on IK on the legs, by selecting them both
![2016-03-04 09_45_57-Blender_ [K__Dropbox_Proyecto_Wacom_personaje_modelo_personaje31.blend]](https://lollypopmancom.files.wordpress.com/2016/03/2016-03-04-09_45_57-blender_-k__dropbox_proyecto_wacom_personaje_modelo_personaje31-blend.png?w=1100)
and then changing the FK/IK attribute from 0 to 1 in both legs in the Rig Main Properties that is usually just above the Rig Layers panel
![2016-03-04 09_46_17-Blender_ [K__Dropbox_Proyecto_Wacom_personaje_modelo_personaje31.blend]](https://lollypopmancom.files.wordpress.com/2016/03/2016-03-04-09_46_17-blender_-k__dropbox_proyecto_wacom_personaje_modelo_personaje31-blend.png?w=169&h=300)
![2016-03-04 09_46_24-Blender_ [K__Dropbox_Proyecto_Wacom_personaje_modelo_personaje31.blend]](https://lollypopmancom.files.wordpress.com/2016/03/2016-03-04-09_46_24-blender_-k__dropbox_proyecto_wacom_personaje_modelo_personaje31-blend.png?w=169&h=300)
DONE! Your character is ready to pose and probably animate for the most part, if you feel it’s okay you can already delete the “metarig” and all the “WGT” objects in the scene.

Thanks! That’s the best introduction to metarig I found around.
LikeLike
Thank you so much!
LikeLike
Almost a year later, I agree with the previous comment. Sometimes explanations are so wadded up with extras, but yours are direct. We get the point. We get there. Thank you!
LikeLiked by 1 person
thank you!, I appreciate it!
LikeLike
Yea great tutorial. I do have one question though. I have seen many tutorials on this and they all mention removing the WGT objects and get rid of the metarig. However, if you expand the newly created ‘Rig’ object, I see ‘Animation’, ‘Pose’, ‘rig’ and ‘Skin_Mesh’. If I click on ‘Pose’ and go into the ‘Bone’ tab I see that the custom shape it is referencing is WGT-neck.
I am curious if this should be re-referenced or if the ‘Pose’ node should be deleted altogether.
LikeLike
You mention nothing about the hands and also skip that important step. In your example you didnt even set the hands. This intro is nice and short, a full tut on this rig will take quite some time, there are quite some nice tuts actually
LikeLike
the main idea is there, at some point I’ll do something more intricate, and there are a loooot of tutorials that go full in depth on how to setup each bone. 🙂
LikeLike